Monday, December 23, 2013

Pumpkin Brownies Recipe

Apologies, this was written up in April, but I left it for the holiday season. At least the day before Christmas Eve is a great release date for pumpkin goodies!


This semester, my Wednesdays have a 6-hour gap between classes. I usually spend it doing some homework or procrastinating. Last week I was talking to a friend, and while talking to him I randomly uttered the words "pumpkin brownie," in sudden burst of craving-fueled inspiration. 
 
The result of my experiment. Success? Success.

So as I was getting back to my place on the bus after my first class, I did what any logical, rational person would do, and decided that since we had cream cheese, I would make pumpkin brownies! 

 
Because I'm such a caring person, I kindly tormented my friend with the batter he could not have.
 
Naturally, once I got home I got my baking apron, took out my ingredients and supplies, and whipped these babies up. I used my brownie recipe as a template, but replaced anything calling for cacao-related products with pumpkin, and added a bit of cream cheese. I made two 8" x 8" pans (20 cm square), or you could use a 13" x 9" (33 cm x 23 cm) for a single pan per batch. 
 
Look at that batter!  Mixed and finished and ready to go! As you can see, I added some pecans to it- thinking of some yogurt chips next time

Pour it out nicely into the pans...doesn't it look just like brownie batter? Or, even better...goldie batter?

Out of the oven and cut. Smell was simply delightful as they baked!  Since these are meant to be brownies, I took them out when the batter stuck to the fork all crumbly-like.

Scrumptious, isn't it? 
 
 
Behold, my precious in all its glory.

---------------------------------------------------------------
Print Friendly and PDF
Pumpkin Brownies
Yields approximately 32 2”-square brownies. 

4 eggs 
1/3 cup granulated sugar 
1 cup light brown sugar 
2 tsp pure vanilla extract 
1/2 cup (1 stick) butter, melted 
2 cups puréed pumpkin or 15 oz. canned pumpkin 
4 oz. (1/2 cup) cream cheese, softened 
1 tbsp ground cinnamon 
2 1/4 cups flour 
1 tbsp baking powder 
1 cup pecans, walnuts, or chocolate chunks (optional) 

Preheat oven to 350˚ F. In medium bowl, beat 4 eggs together, then stir in granulated and brown sugars until fluffy. Add in vanilla extract. 

 In separate, smaller bowl, mash cream cheese and pumpkin into a thick paste. Add melted butter slowly and mix until thoroughly blended. Fold pumpkin mixture into egg mixture and blend until mixture holds together. Add cinnamon. Slowly add in flour and baking powder and mix until well-blended, then add in pecans, if desired. 

Pour into a 13” x 9” or two 8” x 8” prepared baking pans and bake 30-35 minutes, until fork or knife inserted in center comes out with fudgy crumbs clinging. Let cool for 10 minutes before slicing and enjoying your decadent treat! 


Monday, June 10, 2013

Pay de Limón (Key Lime Pie)

     I titled this post "pay de limón" because I had can never remember what key lime pie is called, but I knew it was a dessert I wanted to make. So prior to making it, I had to Google "flan de limón inglés" and "pay de limón inglés." But those were giving me that icky thing I know lemon meringue pie as...until I remembered that the English word for lemon was not lemon, but lime. (Hey, the Spanglish makes sense to me!) 

     These last two weeks have been busy, and I've been wanting to bake. I've wanted to bake a delicious treat, a tasty treat, but also a summertime treat.  Since I just got a new recipe book, and there's a recipe for a white chocolate lime pie in there, I decided on key lime pie!


My key lime pie features fresh lime juice and a crust using crushed almonds as half of the flour. Can you say "yummy"?

      For the crust, I was not about to use graham crackers because I wanted something finer. Solution?  Grab about 3/4 cup whole, shelled, toasted albums and pulverize them to a fine powder in the blender. Blend this with about 1 1/2 cups of flour and 1 stick of butter (1/2 cup) to a consistency you can mold easily when in small tart pans. Or, in my case, muffin cups! (As a quick note, if you haven't made pie crust before, measurements for the flour and butter, or shortening if you prefer it, differ depending on the weather, pressure of surroundings, etc.)
 
 
Here you can see 3 muffin cups with prepared crust, and one with about the amount of dough needed to make a nice crust.
A more aesthetic shot of the same view, just for kicks. Doesn't that almondine crust look scrumptious?

     I layed out the leftover crust in a small, 7-inch tart pan and then proceeded to make the filling as the crust pre-baked, 15 minutes for that lovely texture. Let the crust cool a bit after coming out of the oven, of course, before pouring in the filling! I based my filling loosely off Emeril Lagasse's recipe, though I found it too sour for my liking and added about 2/3 cup sugar to the batter. 

Pre-oven sentencing. Tasty pasty, isn't it?
     
     I did cheat a little and added 3 drops of green food colouring to the batter, for aesthetic's sake. But don't worry, it was organic food colour! And by "organic" I mean the molecule contains carbon.


    Here you can see the tarts after baking in the oven 17 minutes, until the fillings were settled entirely (I jiggled the pan before taking it out.) Took one of them out and placed it on a plate to take a photo.

Is it just me, or is something wrong? 

     The crust texture was all wrong- crumbly and soft, like mazapan, and fell apart when I removed the tart from the muffin pan. I tasted the crust, which did not at all have the toasty almond flavour I expected- in fact it tasted almost...raw.  It took me a second to figure out that I'd likely forgotten to actually set the oven to bake when I set the initial temperature for the crust, since it's a two-dial oven! Oh no! What to do?

That there is my easy-peasy solution. Yay!

     Luckily, my hard cerebrum came to the rescue!  I decided to take all the tarts out very, very carefully so they wouldn't suffer the same fate as the on in the photo. It broke further when I transferred it to the foil paper on the cookie sheet, and you can tell it's the one to the left of the gap. I baked them 15 more minutes before taking them out again, and it worked! I was able to transfer them to a container easily with minimal "dusting" of the crust, and placed them in the refrigerator to cool before being eaten.

     Now, the part you likely scrolled through for- the recipe! Minus the mishaps you may have noticed if you skimmed this post, of course.

Maaaarvelous. Simply maaah-velous.


--------------------------------------------------------------------------------------------------------
Print Friendly and PDF
Key Lime Pie:
Makes approximately 18 mini tarts or 1 deep dish 9-inch pie. 

Crust:
3/4 cup whole roasted almonds
1 1/2 cups whole wheat flour
1/2 cup butter (1 stick), melted

Preheat oven to 350˚ F.  In blender or food processor, pulverize almonds to a fine powder and pour into small mixing bowl. There will be some lumps, but if blended well they should be clumped patches of powder, and will fall apart easily when touched.

Add flour and melted butter, and quickly knead to a paste-like consistency that is moldable but not sticky. It should be just a bit crumbly, but enough to hold together. Press into the bottoms and up the sides of muffin pans or 9-inch pie.

Bake 15 minutes and allow to cool completely before pouring in filling.
 

Filling
1 cup freshly squeezed lime juice 
28 ounces (3.5 cups, or 2 14-oz cans) sweetened condensed milk 
2 large eggs 
2/3 cup granulated sugar 
1 tsp. freshly ground lime zest 

Lower oven temperature to 325˚ F. Whisk lime juice, sweetened condensed milk, and both eggs together in large bowl. The milk will refuse to mix with the juice at first, so a wire whisk is recommended.  Slowly whisk in sugar, followed by beating in lime zest. 

Pour into prepared pans and bake for 17-20 minutes, until filling is settled and does not move.  Let cool before refrigerating 30 minutes prior to serving.

Enjoy!
 
-------------------------------------------------------------------------------------------------------- 
Questions? Feedback? Critiques? Advice? Just drop a comment here and lemme know!

Sunday, June 09, 2013

Steampunk Microphone Process

     So, here's process of a single-file walkthrough I uploaded to my deviantART a bit ago, for this drawing.

Inspiration:
     It was summer, about two weeks or so before my first year of college would start, and I was pretty much just watching random videos on YouTube. Ran into this one:

      Steampunk? I decided to watch just for the fashions, typical me (I had also spent a bit watching the runway sections of Project Runway), when up goes that microphone, and again, and AGAIN.  First glance at it, I realized...it was BEAUTIFUL. Steampunk, but classic microphone, but at the same time something...Greek? Seafaring? No clue, but I managed to pause the video at several instances and screenshot as much of the mic as possible, then got to sketching.  After 10 minutes or so, I had this baby:
     I confess that at this point, I put it away and then forgot about it until months later- shortly before my spring break. Well, once spring break started I got to fine-tuning the overall design of the sketch and messing with it, had a better look at the video, and finally went and inked it. I used my usual mixture of ink and coffee- 1/4 coffee to 3/4 ink for the darker spots,and wa-la! A couple hours later, I had my inked sketch:
     You can see where my inking went wrong with the smudging, but I wasn't about to start over or give up. So I ploughed on to base colouring with coffee and paint+coffee.


     As you can see, there's a couple things that went somewhat awry, but it was decent enough overall for me to go on with my coloured pencils, Sharpie oil paint pen, and more watercolours and coffee. 


     I went for a burnished, antique look- I originally wanted a Hellenistic-style  compass, which is why there's a theta in place of an o.  Yes, I could have used an omega, but it didn't really say "ancient Greek navigation" to me. The lack of accuracy does bother me, of course, but the drawing is done and I'm still happy with it!


Sunday, March 31, 2013

Fearsome Cthulhu


     So I began to make an amigurumi Cthulhu last week, Tuesday after midnight. After all, why work on my chemistry lab report or on my Japanese when I can crochet?  Anyway, was scared of the tentacles at first, but as you can see on my oh-so-smiley face, they were actually pretty easy to do. I'm also thinking of putting a squeaker in it, to make it the fearsome Elder God Lovecraft meant him to be.

Wednesday, February 13, 2013

First photo

     Rummaging through my computer earlier, I was finding all sorts of photos, sketches, and drawings I'd forgotten about or had abandoned. Most were works that required labour, but then I ran across this baby:
      This was the first photograph I took with my digital camera when I got it. I bought it after years of saving, got home, opened it, and made this quick set up to take a snap of. It came out quite nice, but then it languished on my computer until today. Since the aesthetics, to me, still hold, I decided to give it a go uploading it to my dA and blogging about it. Why? Well, do you remember the first photos or sets of photos you took with your first camera, digital or otherwise? It'd be interesting to see that! I myself got worse, but...meh.

Wednesday, January 30, 2013

Roses, cream, and yardage

So, in my blog post about starting work on getting down from designing to creating this cowl.  Not much to update, other than that one skein of Debbie Bliss BFL Aran (75m/82 yds) apparently makes just under 10 motifs. (9 motifs, with the 10th missing only the final two sc rounds.) It also withstands surprisingly well to frogging, as I discovered with the first square- I ripped it out at least 6 times- and that was just the first two rounds- and despite catching on the loose skin on my fingers and slight shedding, as wool is wont to do, it retained its "newness."  Hopefully it'll block just as well!

Saturday, January 26, 2013

Of wood and roses

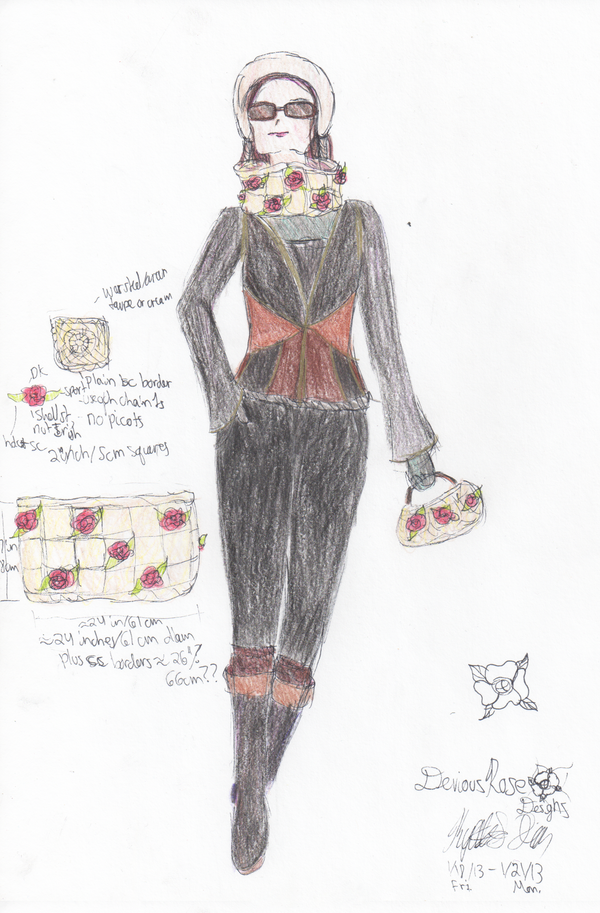
I have begun working on a cowl I pictured up last week. Here you've got the sketch of the design, complete with designed outfit:


~~~

The cowl will be crocheted- here you can see the preliminary motifs for it, crocheted yesterday and today:


The motif that appears to be slightly larger was the "guinea pig" motif, so to speak- poor thing was frogged and ripped back I don't know how many times.  The yarn is good- Debbie Bliss Blue Faced Leicester Aran. It feels like a DK while working, but as you can see it's most definitely an aran- and so soft!

~~~
Edit 1 February, 2015: pattern is live and downloadable for $3.00 USD at http://www.ravelry.com/patterns/library/rosewood-cowl.
~~~
There's already a pattern page on Ravelry for this cowl at http://www.ravelry.com/patterns/library/rosewood-cowl, though of course I have to finish designing this darling before I can add a pattern. ;) It'll likely be $2.00 USD, and I'll be looking for pattern testers once I get to the "just need to weave in loose ends" point. If you're interested in testing, leave a Ravelry comment saying so! Don't worry about commitment- I'll contact anyone who does comment before, to see if they still want to.